

Streaming Options

Streaming Options
Streaming in Gamecaster has two options Auto and Custom. For every newcomer it is best to use Auto Settings since the app will automatically configure what's best for you. This also applies if you're not sure what exactly to set for your first stream with the app.
Personally i recommend doing an Auto test and writing down or memorizing the results then applying some of the them in the Custom Options changing only the resolution and the bitrate but only if you are Partnered in any of the streaming services. Streaming on higher resolution than 720p 30 fps most likely won't be transcoded and your viewers might not have the option to watch you on lower resolution like 720, 480,360 etc. and this might result in losing viewership.

Once you've set your theme and scenes you're ready to hit the Stream button. Gamecaster will ask you for the "Title" and "Category" for the stream. Next click on "Optimize Stream" and the app will start evaluating your system and will set the best streaming options for you.

"You're best optimized!" Now you see the resolution, bitrate, codec and server. Click the "Go Live" button and you'll see your studio again where you will monitor and control your stream. If for some reason you want to run the configuration again simply click on the "Retry" button. For canceling the stream you can click on " I'll stream later".

Setting the Custom Options may look a little overwhelming but it's quite easy once you get to know what you're looking at or if you've written down the Auto Option results.

First thing to notice is your account. From the menu you can choose the Streaming service you prefer. If you're not logged in in another account you will be prompt to that and after confirming authorization you can switch accounts very easily.

Choosing the server is pretty much your decision. You can leave it to "Best Mach (Automatic)" - in this case Gamecaster will choose the best server according to the ping. Or you can pick the closest one to your location.

Resolution - the preference is yours but again, if you are not Partnered with any of the Streaming services you might not get transcoding if you are streaming above 720p 30 fps and your viewers won't get the option to watch you on a lower resolution. Keep in mind that not every person in the world have stable internet connection so you might end up loosing viewership.

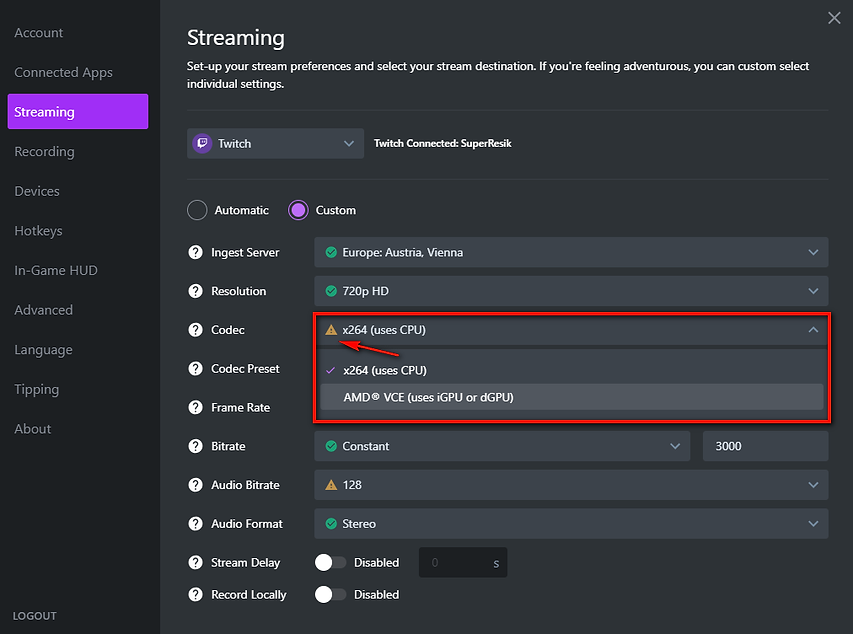
Codec -according to your GPU or CPU you will have the option to choose from x264, AMD VCE, Intel Quick Sync or NVIDIA NVENC. How to know which one to choose? That's why the Auto settings come in handy and you should definitely run it before setting the custom options. Also if the wrong codec is set by default you will see exclamation mark before the name. This will mean that you have to change it but to what? Well if your CPU is not so powerful then you definitely should not pick x264 or Intel Quick Sync. In this case you need to pick the Codec according to your GPU. If your GPU is AMD - choose AMD VCE. If you have NVIDIA then choose NVIDIA NVENC codec.
Codec Preset - for AMD in my case there is no preset. For NVIDIA there are many presets like - Max Performance, High Performance, Performance, Balanced, Quality, High Quality and Max Quality. You might want to experiment and make a few tests to find out which result is best for you.

Frame rate can be set to 30 fps or 60 fps. Again it depends on where you stream, your computer specs, your internet speed and also if you are partnered or not.

Bitrate - for different streaming platforms the requirements are different but in most cases 720p 30 fps requires atleast 3000 bitrate. So you might want to inform yourself about correct numbers for your streaming platform. If your codec is set to AMD, NVIDIA or Intel Quick Sync the bitrate will be constant and you can pick any number. For x264 Codec you will have two options - Constant and Adaptive bitrate.

Audio Bitrate - Options here are from 96 to 192. For streaming 720p it is best setting to 128.

Audio Format - Stereo or Mono. It depends on how you want the audio for your stream to be perceived.

Next Two options are Stream Delay and Record Locally. If you want to set a delay for your stream enable the option and set the delay in seconds. For recording your streams locally enable the option and another one will appear "Split Recordings" by MB or mins. This means that you can split the files by size or duration. For longer streams the files might get bigger so you can easily set how they should be split.

Keep in mind the default destination for your recordings will be on your (C:) drive so you might want to go to Recording Options and select where your recordings should be saved.


